A Year in Photos

Photography, fiction, and personal essays form my three primary creative outlets. For this blog's first 18 months, I used it primarily for photography. As I've returned to creative writing, I'll use this blog for fiction, too. Sometimes, when reality needs to be discussed more than truth, I write personal essays.

This blog will continue to showcase as many above-average photos as I can muster. Hopefully my written work will be as good or better than the visual. Whichever drew you here -- photographs or fiction, I hope you enjoy both.

Friday, August 31, 2012

Bugging Out

Photos of this European Preying Mantis and one quick note only today. Note: Pentax K-7, Pentax Macro Bellows II, Vivitar 135mm 1:2.8. Enjoy!


Wednesday, August 29, 2012

Empire Gold Mine State Park

California is in a budget crisis and many of our state parks are at risk of temporary closure. Empire Gold Mine is not, to my knowledge, one of those parks, but I wanted to use this post to draw attention to this issue.

Closing the state parks would be exceedingly short sited and detrimental. The park system in the United States is our society's great equalizer. In the parks, all people -- regardless of wealth or class -- have equal access to inexpensive or free natural settings. Many of California's state parks charge $35 a night for camping, some being just fractions of a mile from multiple-hundreds-of-dollars-per-night hotels. Granted, for $35 a night you don't get a private shower or a bed which doesn't need inflating, but you do get a place to sleep, another to cook dinner, and 22 hours (check in is 2:00 PM and check out is noon, typically) in nature.


Closed parks also will likely attract more people who want to use the undisturbed spaces for squatting, growing illegal drugs, and supporting other criminal activities. Closed parks could increase the state's risk of catastrophic fire damage. If you'd like more information, or if you'd like to help (I hope you will do both), follow this link:


http://savestateparks.org/


I thought I might end on a monochrome conversion of the first image. Empire Mine State Park is a place set up for taking great photographs. And that holds true for most if not all of our state parks -- California and elsewhere.

It is not hyperbole to say that our parks are in a crisis and we need to be active in making sure they remain open and public. And, hey, would you like a piece of trivia? If you visited one state park each year, how many years would it take to visit all of California's state parks? In 2012, it would take 279 years.

State parks are a great and communal gift to the American people. We must steward them and ensure our state keeps them public, safe, and open.

Monday, August 27, 2012

Star Trek, I mean Trail

Star trails have become a popular 'right-of-passage' type of photo for new photographers to attempt. They require some know-how and access to an area with minimal light pollution, however. So, living east of San Francisco, I can see about a dozen stars on a dark night. Capturing a star trail at home would not be feasible. Over July 4th, I was in Grass Valley, so I pulled an over-nighter and got 254 30-second images for my digital star trail. I also captured a film star trail. Here's the film image:


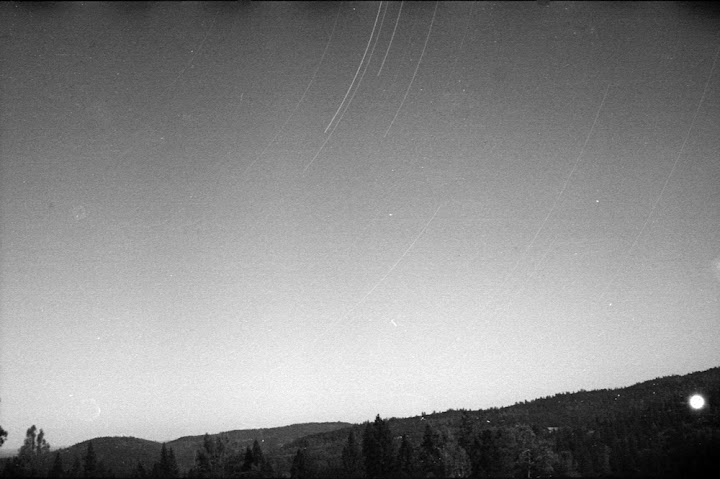
This was shot using 100 ISO Agfa film Next time, I'll try this with 400 ISO. The 100 exhibited poor star capture. It managed to capture the hills, though, because this was a four-hour exposure. Also, next time, I'll have a graduated neutral density filter to use to darken the lower landscape.

My camera for this was one of my Pentax K2 cameras with my Sigma 35-80mm, set at 35 and pointed north-ish. One risk of long exposures is light leaking onto the film through the eye piece, so I borrowed the eyepiece cover off my KM or K1000 (I forget which) and taped it in place so I wouldn't lose it. Then I remembered I needed to compose the image, so I took the cover off, composed the image, then re-placed it.

To prevent camera shake, I used a decently sturdy tripod and placed it in a protected area away from wind. This was the third and longest of my film images, taken after the moon set.

Taking a digital star trails image is a slightly different and requires multiple images. Digital sensors, unlike film, heat up and leave 'hot pixels' on the sensors after a while. Ultra-long exposures can also damage sensors, I've read, though I can't verify that empirically.

There are some pieces of gear you'll need:

1- A digital SLR or other digital camera with manual settings.
2- A sturdy tripod
3- An intervalometer (unless your camera has one built in.)

My Pentax K-7 has a built-in intervalometer for up to 99 images. As of this blog's writing, cheap, new intervalometers that allow up to 399 images can be purchased on eBay for $12-$20 (USD). This allows you to take hours of photos to capture things like star trails or experiment with stop motion.

I set my K-7 to 30-second exposures with five seconds in between. I should have left no more than two seconds in between as the five-second delay left gaps between the stars that were difficult to fix.

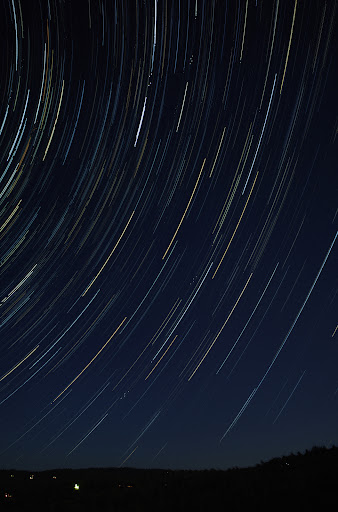
So this is the star trails image. Once I had the 254 images taken, I loaded them in Photoshop as a stack, auto-aligned them (which took hours and turned out not to be needed, since all the images were taken on a tripod-mounted camera. Then I had Photoshop blend the images. I experimented with various layering and blending methods, and arrived at the image above. Not hard, but time consuming.

Well, it's not 100% accurate to say I arrived at the image above. I had lots of little gaps between the stars, so I had to make a copy of the stars layer and rotate it. In order to rotate it, I had to do some geometry to calculate the rotational axis, which was WAAAAAAAAAAAY off the side of the image. I didn't get it quite right, so I needed up needing two layers (one for the outer rings and one for the inner.) You can see in the top middle where the two layers don't exactly align.

If you don't have Photoshop, there are a few free or inexpensive software options. Basically, if you have a decent tripod and decent DSLR (or entry-level DSLR and an intervalometer), you can make a star trails image. I do suggest Photoshop, though, as it allows you to remove the hot pixels that will show up on your image.

A Year in Photos -- Week Thirty-six

We have lots of great posts this week. In fact, they're so good that if I gave you five this week, your head may explode. Literally, not figuratively. Instead, I'm going to do three this week, you know, as a favor.

Back on July 4th, I took a trip up to Grass Valley, California. So this week will have the star trails image I captured that trip, some photos from the Empire Gold Mine, and some macros I captured later that week. With the star trails image, I'll also explain how I did so that you can try one yourself. So, without further delay, here are some images from this week.


This is NOT the star trails image we'll analyze, though I'll explain how to get a star trails image with film as well as digital.


Thursday, August 23, 2012

The Chicago Project -- Day 5 of 5

One of this project's main goals was to create a window into the past through photography. Each photo we take -- snapshot or prize winner -- captures a brief moment in time. I read about a project where extreme pinhole cameras captures multi-year exposures, and the creator theorized that 40-year captures could be accomplished. Even those hyper-long exposures are insignificant flashes in human history, the earth's timeline,  or time since the universe was created.

Humans simultaneously seek to halt change while embracing most every aspect of it, heralding the positive elements as progress. We also, conveniently, ignore the negative elements.

Christmas, 1972 or 1973, Chicago, Daley Plaza. The tree is behind the Picasso, but the Picasso, here can become a window.


The original vantage point is now a fountain, and it was cold and I didn't want to get my feet wet and catch pneumonia. So here is as close as I could get. It's close, but not perfect.


I'm not sure what Photoshop was thinking with this blend.


In hindsight, I should have included the modern people in the lower left corner, but I was preoccupied with the tree and unchanged buildings.

This project was about more than just photography, and history, and using technology to create images that would have been impossibilities when I began taking photos. This project became a way for me to give my girlfriend and her father something to discuss, some time for a conversation about who he was when he was our age.

Wednesday, August 22, 2012

The Chicago Project -- Day 4 of 5

Day 4 of the Chicago Project shows, more than any other day's image, how dramatically Chicago has grown since 1971. In the original picture, only the Standard Oil Building is in the frame. In the 2012 image, many other skyscrapers have joined the skyline.

Regardless of the image itself, this pairing tells a story about great city management, effective and sustained economic growth, and the diverse and attractive architectural scheme in Chicago.

The original image, from 1971, is not my favorite. From a technical standpoint, the bird is soft and the Standard Oil Building sharp, indicating a shallower depth of field. The Fujichrome film was probably 100 ISO, and on a sunny day that could translate into an aperture of 6.3 for a 1/1,000th of a second exposure. My guess is that this was around f6.3. The digital image below was shot at f10, which is about where the Sigma performs the best, and this aperture yields a very nice sharpness across the entire image's depth.


Photoshop blended the image with some serious and pervasive color and ghost-type issues. But I do like how it blended the park areas from each image.


My goal with this image was to have the old image elements on the left with the new on the right. Each side also contains some images from each image. The middle is a blending ground where the two images meet.

Tuesday, August 21, 2012

The Chicago Project -- Day 3 of 5

Day 3 of the Chicago Project features one of the Chicago River's bridges, though not the DuSable Bridge. The goal here was to make the two bridges blend, like a bridge connecting 1971 and 2012.


This is the one time that I feel Photoshop did a meaningfully better job than I did.


One major difficulty in this blending, the original vantage point was now no longer accessible. So I got as close as I could. The tree did not help matters any, either. In an effort to keep the sky blue, the tree had to become a partial ghost. I don't care for that, but any other attempt would have yielded awful compositing results.

Don't get me wrong -- I'm not claiming these are great compositing results.

Monday, August 20, 2012

The Chicago Project -- Day 2 of 5

Day 2 of The Chicago Project happens near day 1 -- the DuSable Bridge. In 1971, though, it was brand new and called the Michigan Street Bridge.

The first images features two 1970s guys talking, or arguing, depending on how one reads body language. The 2012 image has only people crossing on the far side of the bridge. However, I wanted an image with people from both images. And that classic 1970s car.


One difficult detail to capture, the 2012 image had no shadows -- the sky was overcast and the light too even. The 1971 image does have shadows. Some creative erasing, and I put hints of shadows in the merged image (check along the bas relief's right side.)


My idea here was to show past and present blending with aspects of the old structure and new combined as well as showing the specter (exhibited here as a ghostly building) of future progress looking ever-present in the background. Likewise, in the foreground the sign is a ghost, making the only permanent things the bas relief, 70s people, 70s car, and modern people behind the 70s car.

As I said yesterday, buildings are mankind's longest-lasting monuments. But they serve no purpose if they don't serve us. The intent was to combine people from both images to show how --despite change -- the bridge still carries traffic and people and, in that way, fulfills its purpose.

Sunday, August 19, 2012

The Chicago Project -- Day 1 of 5

Since February, I've been working on a project called The Chicago Project. Spurred by slides my girlfriend's father took in Chicago between 1971 and 1973, I decided to replicate some of his shots. In April 2012 -- 41 years after the original slides -- I went back to my home town to replicate the images.


This first image is the original 1971 image my girlfriend's father took walking north on the (then named) Michigan Avenue Bridge a few days after it opened. Note the classic old car, people with fabulous plaid pants, brown-glass globe lamps -- these are classic 70's cheese. Even the traffic cones lack modernity. Of course, today's traffic cones are hyper-obnoxious orange(?), which is contemporary cheese.

You'll notice in the re-take that the buildings are mostly the same with a new addition on the left (top left, peaking out from behind the old building I forget the name of.) Also, astute readers will notice that on the right, a sign used to be in front of that onion-top.

But more likely you'll notice the Toyota Prius, flags instead of lamps, and other contemporary cheese. Yes, I just called a Prius cheese. What remains the same, unchanged in 41 years, are the buildings that exist in both images. Stone or concrete, these structures will -- unless demolished for future progress -- likely outlast everyone who ever reads this blog. Buildings are humanity's longest-lasting monument (though pollution will be our longest-lasting legacy.)

In Photoshop, I opened both images in a stack and resized the old film image to match the new image's height. Because of the different aspect ratio in my lens versus the Takumar, I then corrected the geometry in my image to match the original. Being a slightly higher resolution image (14.6 megapixels instead of 12.5 or so), and also being a native digital file, geometry modifications delivered better results with my image.

I then manually blended the two images. With my image on top, I used the eraser tool, set on brush, and between 5% and 80% opacity (depending on the need and my stylistic ideas) and went to town erasing some of the modern content to blend the images. After that, I undid all the erased areas and had Photoshop blend the images. Today, as for the rest of the week, I'll show you the Photoshop-blended image first then my image.


As you can see, Photoshop yielded unsatisfactory results in this case, using automation. The manually blended image allowed me to keep people as ghosts, do the same for cars, and even blend the old and new building images selectively. Note that most of the onion-topped building is new, but it has the old sign. The flags are present, but so, too, are ghostly renditions of the globes. The 70s people are walking along the bridge, but so, too, are ghosts of the modern people.

Tomorrow we'll take a look at an image of one of the bridge's entry columns, a stone brick structure with a bas relief and some people.

A Year in Photos: Week Thirty-five

It's been a long hiatus due to work, changing jobs, my old commute length, and a number of other factors. But, the blog is returning. The frequency will likely be a bit sporadic, but this week at least we have five posts. I also have enough material to keep this blog daily until almost the end of September. So, this week we'll be looking at a project I call The Chicago Project. Earlier this year my girlfriend's father gave me 5,500 slides or so to can for him. A few months later, in April, my girlfriend and I visited Chicago. I grew up there so I recognized many of the places in his photos, so we set about recreating the images. This week we'll see five location shots that comprise The Chicago Project. Each project installment includes the original photo, my re-take, an Adobe Photoshop image blend, and my manual image blend. The image blends are intended to merge past and present, create a bridge between photo taken 41 years apart.

The original photos were taken with a Pentax Spotmatic SPII and Takumar 50mm 1:1.4 with Fujichrome film. The new photos were taken on a Pentax K-7 with a Sigma 35-80mm lens and an APS-C sensor. The crop factor complicated the image captures because the focal length was different. Because of the APS-C sensor's crop factor, the Sigma behaves like a 52.5-120mm lens. So the focal length is close, but not exact.

Here are the original images we'll be looking at this week along with their updates and blends.


2


2


2


2