A Year in Photos

Photography, fiction, and personal essays form my three primary creative outlets. For this blog's first 18 months, I used it primarily for photography. As I've returned to creative writing, I'll use this blog for fiction, too. Sometimes, when reality needs to be discussed more than truth, I write personal essays.

This blog will continue to showcase as many above-average photos as I can muster. Hopefully my written work will be as good or better than the visual. Whichever drew you here -- photographs or fiction, I hope you enjoy both.
Showing posts with label Sigma 35-80. Show all posts

Monday, June 3, 2013

Putting the fun in Fort Funston

Back in April I took my dogs to Fort Funston's dog beach so they could swim in the ocean. It went well in that I only lost three toys (and only one of them cost more than $10.) I developed and scanned the monochrome film from that day, but haven't processed the slide and color negative film yet. So you may get to see more dog photos. Until then, here are some shots from around Fort Funston.


Hannah stares contemplatively out at the ocean, pondering if it has an end, what rests on its far side, and if there are dogs there.


After losing my floating Kong (the second one I've had which didn't ACTUALLY float...), the dogs found this nasty tennis ball. That, too, belongs now to Poseidon.


Fort Funston has some pretty wicked trees.


For scale, Hannah is about 95 pounds and around 27 inches at her withers.


After the beach, we stopped a 99 Ranch for dinner. I decided, on a whim, to make crawdads. I need to learn how to make crawdads. Even following the directions, they weren't that great. I think my broth was to blame.


This guy was really unhappy at the prospect of being cooked.


Carrots, potatoes, and celery -- a nice foundation for a veggie stew, but somehow it just didn't work with the crawdads.

Thursday, November 1, 2012

Single Image, Lots of Scale

Lest you think I'm simply a photo-stitch fauxtographer, I wanted to share an architectural photo I took that is a single shot. I set myself up for this shot by selecting my place and waiting for people. This took very little time.

Without the people, this bridge has neither scale no depth. This shot shows that the spire is a good distance away and the person near the spire shows it has significant height, too.

Wednesday, October 31, 2012

The Agony of an Almost-usable Shot

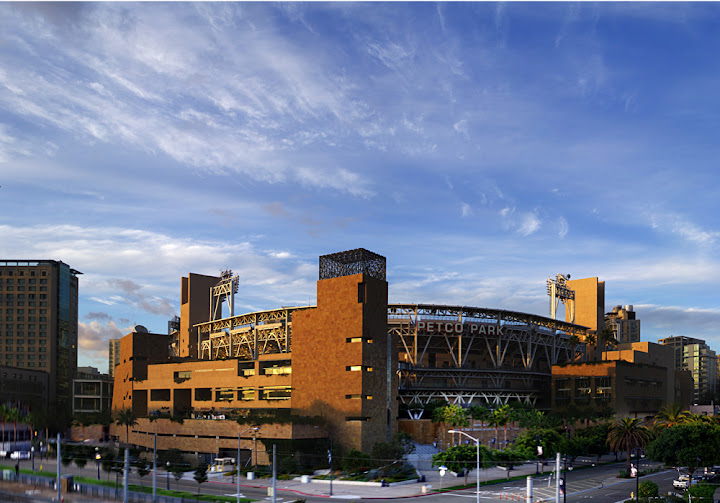
This is a heart-breaking shot. I took this from a pedestrian bridge by Petco Park and this is a 98% perfect shot. Check out the lower-left corner.


Yeah, you see it now and you can't un-see it and the photos probably ruined for you, too. That's a blurry corner because someone happened to be running past me as I took a photo, and I didn't realize it.That corner and the two images around it were unforgivably motion-blurred. It was as though The Thing were running behind me. I cropped out as much as I could, but as you can see, three bad photos ruined a collage made from twenty-five otherwise fine images.

Had I been using a tripod -- same result. This was avoidable only had I been paying attention to my surroundings and noticed that the bridge was shaking too much.

Tuesday, October 30, 2012

Another Way to Mess up a Photo Stitch

Yesterday we looked at just one of myriad ways to screw up an otherwise fine shot. In this, the images suffer from SUBSTANTIAL barrel distortion and the stitching even has some issues.


Know what frustrates me most about this image? I nailed the sky. I love building photos with dramatic skies. And this was exposed darn-near perfectly and adds a very unnecessary flair to this shot. But the image was ruined by the way the building rendered. I count no fewer than four major issues in this photo.

1- On the left, the palms are all blurry. The exposure was too long and I was hand-holding it. Ever heard the axiom garbage in, garbage out? Well, that's incredibly true for stitched photos. Put together thirty bad photos, or even twenty-nine good photos and one bad photo, and you will invariably have a bad photo stitch. That blurryness (and issue we will see again tomorrow) is inexcusable.

2- Next to the blurry image is a random dark spot. That's not due to an overhead cloud, but because one of the images exposed for the sky, not the building, and the photo software had to include it because I only took one shot of that spot. I could have prevented that by doing what I described yesterday: taking a complete set of the building metered for the building, then taking a complete set of the sky metered for the sky.

3- The building looks like it's rounded. This has to do with how the photo software elected to stitch the images. This could be corrected by simply forcing a different stitching method. However, that's not a truly worthwhile effort because of problems 1,2, and 4.

4- I fixed the issue, but on the right side the triangle shapes along the roof appeared to be forming out of a foggy miasma. The photo editing software elected to blend the building and sky. The result was far from pleasing and much closer to ill-making. So I cloned the other triangle forms a few times to rebuild the ones that were blended into the sky.

And, ultimately, why would I want to invest tons of time in fixing the above photo when I have the below one to use instead:


Different perspective. This was from a different angle on the building and lent itself well to the building not appearing to bulge. Also, while I did have to fix one of the roof-line triangles, this image is largely successful. I also had to remove some other photographer's tripod. He was nearer the first photo's location, so I imagine that his photo probably has some ugly bulging, too. Unless he was going the HDR route. Yuck. But he did use a Nikon, which is almost as good as Pentax. Just sayin'.

Anyway, this goes to the last point: if you have an assignment or are just photographing for fun, take multiple images. Don't take one snap and call it quits. Sure, you would from that get some good shots with enough time, but in terms of setting yourself up for success, it's best to take multiple similar shots.

Monday, October 29, 2012

How to Mess up a Photo Stitch

Taking a good photo is hard. Taking 30 good photos with the aim of making a single good image is substantially more difficult.


The problem with this image is immediately evident. About 1/3rd of the way from the right, the sky becomes a different shade and the clouds blurrier. That's due to the Hilton on the left. The Hilton is a large, white block reflecting a TON of sunlight, which altered the sky's color for the individual jpgs that included that structure. The sky on the right third comes from at least one image where the sky is the predominant aspect, so it represents what the color should actually be.

Unfortunately, that major problem ruined an otherwise fine, but boring, photo. How could I have avoided it? I should have metered the sky and then used the auto exposure lock button for a row of images of just the sky; then photographed the Hilton in a separate group; then photographed the triangles by the convention center in a third group. That would have metered each of the image's components properly and results in an image that was properly metered from side to side.

So, today's photo stitching tip: imagine the final image and then scan the scene for metering issues. Use your camera's exposure lock feature to photograph each major component at the same setting. The software will figure out the placement, in all probability. If not, some minor fixes can be done. We'll see those tomorrow.

Sunday, October 28, 2012

San Diego's Harbor Club East and West

Tied as the eighth-tallest buildings in San Diego, the Harbor Club East and West are both 424 feet tall and 41 stories.


The first thing to understand about this image is that it is not a single image. You're probably familiar with the practice of photo stitching -- panorama creation. This process combines multiple images to create a seamless, single finished image. 

This image began life as 36 14.6-megapixel images. If the images did not overlap in anyway, that would be a 525-megapixel finished product. Now, the images do and must overlap. Lenses have color drop-off and vignetting on the edges, so there's a limited, central range where each image can contribute to the overall composition without causing strange lighting problems in a photo. So this image's original is actually 7,447 by 6,633 pixels -- 49.4 megapixels. Yes, your math is correct -- less than 10% (on average) of each image is used in the final composition.

Why, though, this amount of waste? The most in-focus part of an image is the center. As the image progresses to the edge of the image circle (and frame), the image quality begins to blur and darken. So using only the central portions of the photos means that only the best parts of the images are retained -- only the most-in-focus areas used.

You'll notice this image seems exceedingly sharp and detailed. Part of that is because only the sharpest part of each image is used and part of that is because this 49-megapixel image was downsampled to a 0.8-megapixel image for this post. The actual pixel-by-pixel clarity is not any greater than in a typical image.

The Internet contains myriad guides to photo stitching. Suffice to say, you will need a camera and a software capable of creating stitched images. There are purpose-made programs for this use if you don't have Photoshop.

For the other posts this week, we'll look at some of the pitfalls to this technique and why they occur.

Wednesday, October 24, 2012

Overnight Camping Photos

Last week I camped Monday night on Mount Diablo in Walnut Creek, California. I stayed in the Juniper Campground, the highest on the mountain, and took a site I thought would have good views. Here are some of the remaining images (the others being the star trails from yesterday.)


Night must have been truly terrifying for primitive man. Heck, I had three raccoons in my campground off and on and that was terrifying enough. Sly little buggers, raccoons.


Sunset over Walnut Creek, California. Not an easy capture, but the result is pleasing.


Actually, this isn't from the campsite. This is from the visitors center at the summit, looking North to Concord and Clayton.


This is also from the summit, looking South, toward Danville.


Sunrise at the campsite, in the same place where I took the plane and star trails photo.


Sunset from the campsite.


Sunset from near the campsite. With views like this, how could anyone not love this campsite? This is a wonderful place to spend a few nights.

Tuesday, October 23, 2012

Creating Star Trails

Star trails are a fairly easy 'showy' photograph to create. You need three things: a camera with manual settings, a tripod, a place with visible stars. This technique, however, is also good for other composites. The basic premise is to take a lot of photos in rapid succession, stack them all, and then erase all of the parts that are the same on each layer. This leaves the unique elements from each image and allows a photographer to capture long exposures without some of the long-exposure issues such as calculating film ISO and exposure times.

Step 1: Find a location that you think will yield interesting results. Even for your first image, interesting results are worth shooting for. There's a chance you'll get a great shot and the good results will likely spur you on to try again and improve from your previous efforts.

Step 2: Set up your trip pod and frame the shot through your camera. If you are going to do this on a new moon and don't have good lighting for your subject (e.g., if you're in a remote location without bright enough lights to yield good visibility through your viewfinder), set it up during the day, note your direction and tripod settings, and then return at night and re-apply the settings.

Step 3: Take a test shot. For star with no other light, I find that 30 seconds slightly stopped down (say f4) is pretty good. But take a test shot and adjust your settings until a single image looks good. Then set up your camera to take a LOT of photos. Most high-end DSLRs have a built-in intervalometer. An intervalometer takes a series of photos at a set interval. My K-7 can take up to 99 images with a minimum of one second between each image. That means that every 51 minutes and 15 seconds, my K-7 takes 99 images. So, if you want nice, long trails that require about 300 images to take, it will take about three hours and three intervalometer resets.

If your camera does not have a built-in intervalometer, you will want to buy one. Most purchased intervalometers run in the $15 to $35 range. These will typically take up to 399 consecutive images. So, set up your intervalometer and get ready.

Note that on my first image attempt I put five seconds between images to help keep the sensor cool. This was a HUGE mistake. The trails all had noticeable gaps between them that I couldn't get rid of. The image was taken over six hours with 400 images or something. 400 images times about 45 stars per image means I would have had to manually fill in 18,000 gaps. Pass.

Step 4: Take a series of images.

Step 5: If you have an EXTENDED version of one of the recent Adobe Photoshop versions (I have CS 4, so at lease CS 4 and later), you can automatically make star trails in Photoshop. Note that every time I've tried this in Photoshop without using a custom extension, I've had AWFUL results. So I use the Star Trails Stacker by Floris script for Photoshop. There are a number of free programs JUST for star trails photos, too. So you can do this without investing $700 in Photoshop.

Step 6: Blend the images. God help you if you elect to do this by hand. Assuming you use software, mess around with the settings and see what results you find the most visually appealing.

There you go -- a star trails image.In essence, it's just a lot of shots stacked and blended. Unless you have a film camera, then things get interesting.


This image was taken with 260 five- or six-second captures. This was more an experiment to capture airplanes landing at SFO. The stars were an added bonus.


This was an intentional star trail but with an accidental gap in the middle. The image itself isn't very good, though.

Thursday, September 13, 2012

Sterling Winery, Pretty Good Photos

About a month ago I visited Sterling Winery in Calistoga Springs, California, for the second time. It's a very well designed winery with great architecture and lighting. Specifically, the way the outside light interacts with the buildings is very appealing. Sometimes a structure feels like it was designed to be photographed. This is one of those structures.

All of these shots were with my Pentax K-7. For lenses, I used my Samyang 18-28, Sigma 35-80, and Quntaray (Tamron) 70-300. Post processing included minor unsharp masking (15% with a 20-pixel radius) and some color or shadow enhancements.


This winery building awaits after a brief tram ride. The tram ride is part of the attraction and great fun. This building, however, is the end of the tour.


Behind that wall the first greeter and taste presetner waits. The tour includes four wines for tasting and a free glass.


After the first wine, here is one of the glasses on a bench.


Here you can see how shadows work with the building structure to create an additional dimension. Without the shadow-wall interplay, the building would be little more than a nice mission-style building with great views.


Additional shadows on an adjoining outside walkway.


This image shows an open area. I'm not sure what it's for as it's been roped off, like a footballer's private club party, both times I've visited the winery.

A hallway and a junction. Up to now, all the images had been taken with wide-angle or standard lenses. This was a telephoto (the Tamron) shot. Telephotos tend to make images look flat due to their increased depth of field and the ratio of magnification versus object distances. Were it not for the tree in the middle of the shot, the building would look flatter than a wall. As for why it's in black and white? I forgot to take my camera off tungsten after we went inside so the original was blue.

More shadows working on the walls.


N.B. the vignetting and chandelier's shadows on the wall. This was the fifth iteration of this image and the intended look I had when I took this shot. To arrive at this image from an original that somewhat washed out the wall and had only faint shadows required multiple layers, blending, mashing, and opacity as well and opacity type changes.

Monday, September 10, 2012

Ultimately, This Will Happen.

One of my girlfriend's college buddies got married a few weeks back, and after the service I snuck off to the Placerville Union Cemetery to photograph some headstones. I've never done this before, so I did my best to ensure the results did the memorialized justice.


Somehow, hopefully age and not vandalism, this Virgin Mary statue lost its head. Someone had a great idea to place a flower there, instead. I dig it.


SO MUCH DYNAMIC RANGE! Actually, neither this nor the next shot (the color version of this monochrome conversion) resulted from HDR photography. The shot below was the first I made and through layers, exposure adjustment, and selective layer erasing, I arrived at this result (and subsequently the monochrome conversion above.)


This is a very masonic obelisk.


This is the other side of the very masonic obelisk.


This cemetery has some extremely old headstones, but this isn't one of them. Only 1949. Some of the headstones were in this cemetery before this marker's person was born.


Unfortunately, though, some of the headstones have broken. Like this one which, judging by the moss growth on the fracture, broke some time ago.

Sunday, September 9, 2012

Stag Night at the Bluet Damselfly Singles Bar

During a hike in the Castle Rock Open Space in Walnut Creek, California, I strolled down to a favorite place for my dogs to cool off, drink some water, and lie in the shade. As a sidebar, I don't recommend this any more because my Rhodesian Ridgeback got a very bad case of hemorrhagic gastroenteritis brought on by some bug in the water. Anyway, while one of my dogs was getting herself sick, I took some photos of some bluet damselflies -- all male -- handing around the water and reeds.


Complicating the shots, because this was in shade, I had to use 400 ISO, high by my standards. The lens is my Tamron-made Quantary 70-300. The lens is prone to purple fringing, exaggerated at high ISOs.


Purple fringing, however, isn't an issue in monochrome photography. So I converted one of the images to black and white in Photoshop. Here's the original:


You can see some purple fringing around some of the highlights, especially highlights that touch dark spots.

But I called this post "Stag Night at the Bluet Damselfly Singles Bar." Why? Because there were about eight or ten male bluets hanging around. Here I was able to catch a few of them in one shot.


Nature is pretty great. As much fun as buildings, bridges, and statues are to photography, not much tops randomly encountered nature. For me, Castle Rock is about the best place to hike in Walnut Creek. My dogs can go around off-leash, the hills have a nice array of flora and fauna, and with a keen eye there are nearly unlimited photographic opportunities. Plant leaves, for instance:


An adjacent hill in Brooktree. A red tail hawk or golden eagle circling above an old tree makes for a decent image.


Downed trees and myriad other natural objects provide great latitude for black and white photography.


And, if you're luckier than me, you can catch a spider or other, larger predators.