10- Scout it out on Google Earth or Google Maps.
In 2013 I spent a few days in Hawaii. I knew I would have two hours per day on only two days in which to photograph Honolulu and Waikiki. So I set about planning my trip on Google Earth. I didn't plan a specific route, though there's nothing wrong with that. Instead, I found some interesting buildings to photograph and used Google Earth's 3-D views to find angles that would align well with the light and from where I could obtain good photos without a permit or special permission.
I found that the Hawaii Prince Hotel presented a good opportunity for a sunset image. From Earth I scouted Ala Moana Park along the waterfront.
Here's a link.
So the park, on the left, provided a view from the hotel's western face. With the sun setting generally behind me I figured it would light the building nicely in a red cast and also provide some dramatic sky tones, especially if there were clouds.
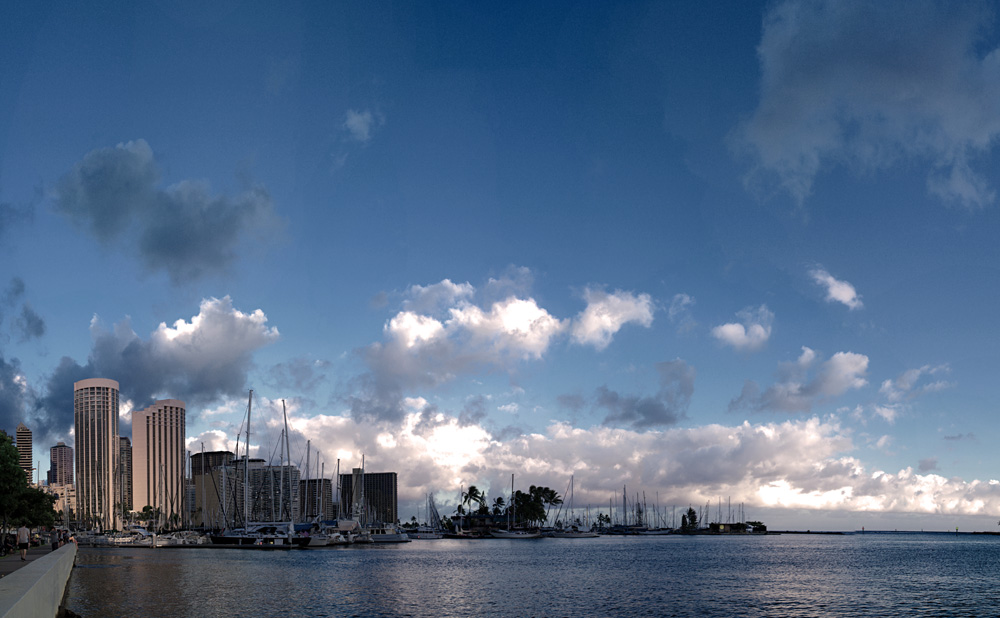
The result is generally pleasing with the spotlight-like building lighting a happy coincidence. I didn't see this in Google Earth, but the harbor's breakwater provided a great leading line to the building. I also didn't see the stairs leading down to the water in Google Earth, and that vantage provided the best image.
So when you find a public subject, pull it up on Google Earth and narrow down your best vantage points so that the next two steps can be more effective.
9- Scout it out on Panoramio.
If you've never used Panoramio, it's an option you can turn on in Google Earth or Google Maps. It shares images that other people have taken in a spot. Here's what the area around the Hawaii Prince Hotel looks like. I find that Panoramio photos help me decide if a building or statue or whatever has character. I've never ruled out a subject because of Panoramio, but I have ruled out poor angles and places on maps that appear to have good vantages but in reality do not. Panoramio helps me cut my vantage point selection and weed out ones that won't work well.
8- Scout it out in person.
After you've used Google Earth or Maps and Panoramio to narrow your selection of vantage points, visit the site in person to verify what you've found. This will be extremely important and helpful. Both of the above tools cannot tell you what something looks like on the day you're shooting. For buildings, windows washers or construction barricades can ruin a shot. For statues or public art six years since it was last cleaned by the pigeon patrol can ruin a shot. For street photos, construction or a road closure can ruin your shots. So in-person scouting is absolutely vital.
7- Take sample shots during your shouting trip.
Ideally, you should scout a few days in advance if you can and then the day before. The first visit helps you cogitate on how to approach a subject and gives you a few days to ponder the approach you select. The last day will help you field-verify your approach. Also, bring a camera with you when you scout. For this a cell phone or smaller camera is fine if you plan to use a large DSLR or medium- or large-format setup for the shoot. The photos you take during your scouting trip should be intended for reference and to document possible difficulties in your shot, such as an immovable and unsightly construction zone.
6- Know what photos you're going to take and develop a plan.
With your sample photos at your computer, review the vantage points you'd like to use (ideally, you will have sample photos from each vantage point) and decide which present the best options for composition. Does one vantage point present your subject well but have a large construction crane in the background? Maybe another vantage point shows your subject's worst face or has poor lighting.
Even if some of these situations exist, they can be overcome with forethought and planning. Use your sample photos to refine your vantage point and determine how to eliminate elements within your scene that you don't want to include.
5- Conceptualize the photos you want and maybe storyboard some.
Try to image your subject in your mind. How does it look? What perspectives present in the manner in which you wish to convey it? How would it look from a different perspective?
Now image what you would like your image to look like. Where would the light fall, ideally? Based on that, where should you stand and when should you take the image? Do you want to stand next to or far away from your subject? Imagine in your mind how you want your ideal image to look, analyze the image's details, and determine how to control your subject so that those details carry into your final image.
4- Create a checklist for your kit.
The image you want to create will determine your kit. If you're looking for an expansive image capturing a lot of content or a close-up image with drama and scene distortion, something in the 24mm range ought to work well. For an image that looks like a scene that human eye would recognize, a normal lens works well. If you plan to take portraits of a static subject, a short-range telephoto is a good choice. So understanding your subject will let you know what lens or lenses you need, if you plan to bring reflectors what color they should be, if auxiliary lights are important, how sturdy a tripod will be required, and other important items.
Create a checklist for your shoot. Be sure to bring extra batteries and memory cards or film. If you expect to take 200 photos, bring enough power and memory for at least 400 if not more. Having run out of both power and memory on occasions, I speak from experience when I say it's not a happy experience.
3- Lay out your kit the night before and verify it against the checklist.
Set out all the items you plan to bring for the shoot the next day. Empty your bag's pockets and keep them unzipped. Check off your check boxes with a single stroke like this "/" to verify all items are present. When you pack them in your bag, add another stroke to make an "X". Then you will know from your mark that you have all your items and that they're packed.
2- Bring extra batteries, memory or film, and a spare body.
I know I noted this above, but it's important enough to warrant a second mention and its own heading. Nothing will make you look silly to a client faster than arriving without the ability to complete a shoot. Unlike the old days of photography when drugstores sold camera batteries and an early lunch could cover a trip to pick up batteries or film, today you bring it or you work without it. Working without charged batteries and memory cards is a challenge if you shoot digitally.
1- Plan for something going wrong and be prepared to respond quickly.
In most every shoot something will not go as planned. The weather won't cooperate or the lighting will be wrong, a street will be closed or someone will have sprayed graffiti around overnight. Identify the shoot's greatest risks and have a plan in place to react if needed.
If you're shooting a wedding and it rains, are you carrying a fast enough lens and some flashes so you can shoot inside? If you arrive at a site to photograph a building and a garbage can out front tipped over in a wind storm the night before are you early enough to clean up the garbage and still get the lighting right in your photo?
Having an emergency plan for possible scenarios is a must. If the shoot goes awry and you don't have a plan, steps 10 through 2 won't have mattered at all.
Top Ten Tuesday will be back next week with Ten Great Google+ Photography Communities.
No comments:
Post a Comment